Getting Started with Emissary
Contents
1. Installation
We’ll start by installing Emissary into your cluster.
We recommend using Helm but there are other options below to choose from.
Connecting your installation to Ambassador Cloud
Now is a great moment to connect your new installation to Ambassador Cloud in order to fully leverage the power of Emissary and the Developer Control Plane (DCP).
-
Log in to Ambassador Cloud with GitHub, GitLab or Google and select your team account.
-
At the top, click Add Services then click Connection Instructions in the “Connect your installation” section.
-
Follow the prompts to name the cluster and click Generate a Cloud Token.
-
Follow the prompts to install the cloud token into your cluster.
-
When the token installation completes, your services will be listed in the DCP.
2. Routing traffic from the edge
Emissary uses Kubernetes Custom Resource Definitions (CRDs) to declaratively define its desired state. The workflow you are going to build uses a simple demo app, a Listener CRD, and a Mapping CRD. The Listener CRD tells Emissary what port to listen on, and the Mapping CRD tells Emissary how to route incoming requests by host and URL path from the edge of your cluster to Kubernetes services.
-
Start by creating a
Listenerresource for HTTP on port 8080:kubectl apply -f - <<EOF --- apiVersion: getambassador.io/v3alpha1 kind: Listener metadata: name: $productDeploymentName$-listener-8080 namespace: $productNamespace$ spec: port: 8080 protocol: HTTP securityModel: XFP hostBinding: namespace: from: ALL EOFThis Listenerwill associate with allHosts in your cluster. This is fine for the quickstart, but is likely not what you really want for production use.
Learn more aboutListener.
Learn more aboutHost. -
Apply the YAML for the “Quote” service.
kubectl apply -f https://app.getambassador.io/yaml/v2-docs/$ossVersion$/quickstart/qotm.yaml
kubectl get services,deployments quote to see their status.
- Generate the YAML for a
Mappingto tell Emissary to route all traffic inbound to the/backend/path to thequoteService.
In this step, we’ll be using the Mapping Editor, which you can find in the service details view of your Ambassador Cloud connected installation. Open your browser to https://app.getambassador.io/cloud/services/quote/details and click on New Mapping.
Default options are automatically populated. Enable and configure the following settings, then click Generate Mapping:
- Path Matching: /backend/
- OpenAPI Docs: /.ambassador-internal/openapi-docs
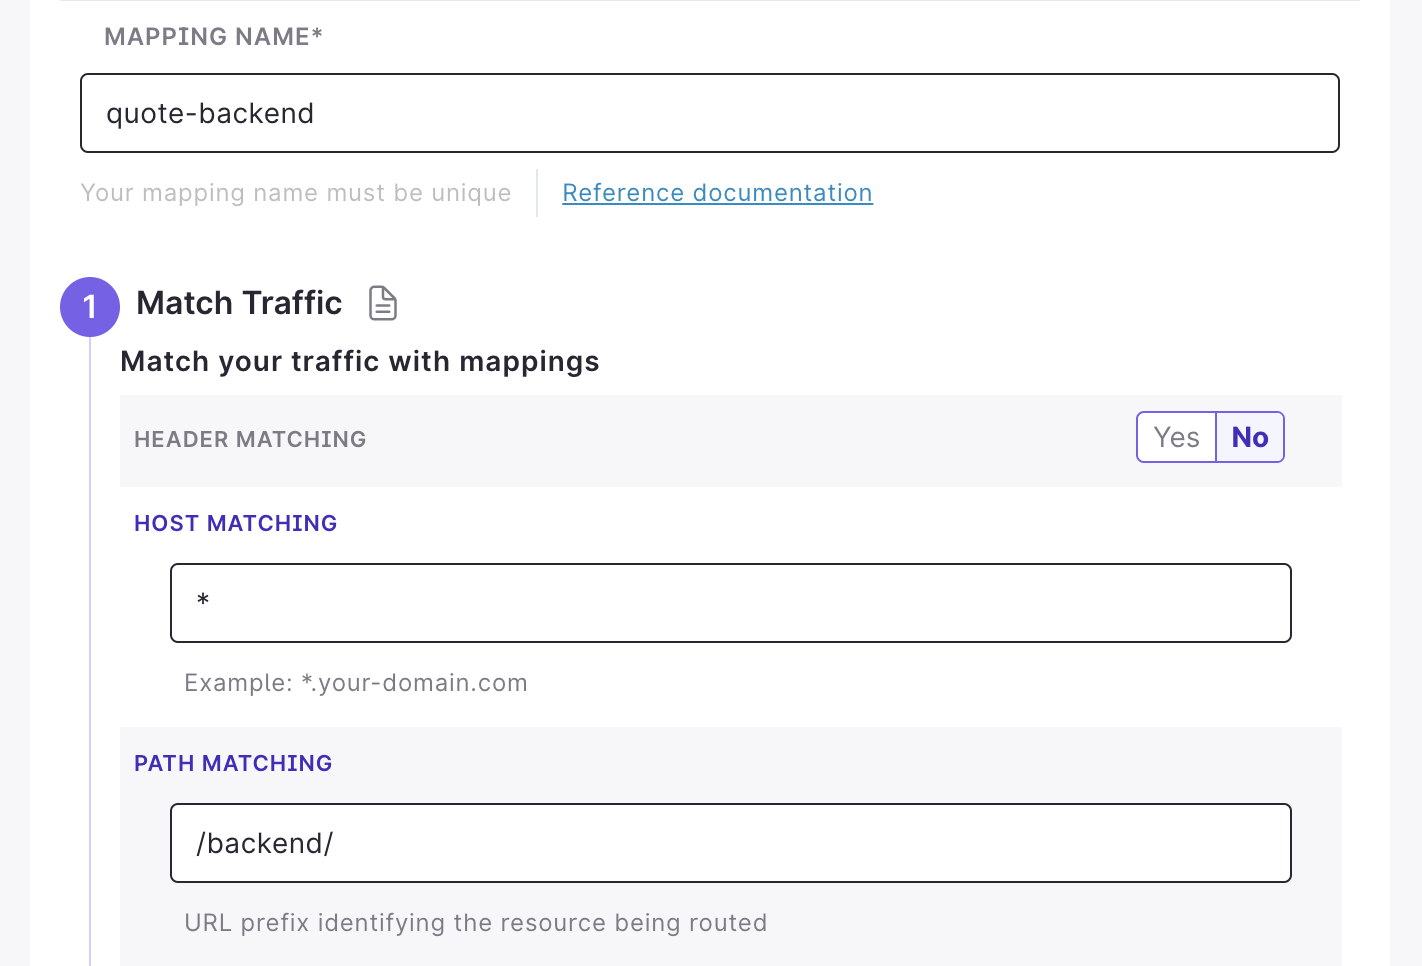
Whether you decide to automatically push the change to Git for this newly create Mapping resource or not, the resulting Mapping should be similar to the example below.
Apply this YAML to your target cluster now.
kubectl apply -f - <<EOF
---
apiVersion: getambassador.io/v3alpha1
kind: Mapping
metadata:
  name: quote-backend
spec:
  hostname: "*"
  prefix: /backend/
  service: quote
  docs:
    path: "/.ambassador-internal/openapi-docs"
EOF
- Store the Emissary load balancer IP address to a local environment variable. You will use this variable to test access to your service.
export LB_ENDPOINT=$(kubectl -n $productNamespace$ get svc  $productDeploymentName$ \
  -o "go-template={{range .status.loadBalancer.ingress}}{{or .ip .hostname}}{{end}}")
- Test the configuration by accessing the service through the Emissary load balancer:
$ curl -i http://$LB_ENDPOINT/backend/

  HTTP/1.1 200 OK
  content-type: application/json
  date: Wed, 23 Jun 2021 15:49:02 GMT
  content-length: 137
  x-envoy-upstream-service-time: 0
  server: envoy

  {
      "server": "ginormous-kumquat-7mkgucxo",
      "quote": "Abstraction is ever present.",
      "time": "2021-06-23T15:49:02.255042819Z"
  }
Listener and Mapping, routing a request from your cluster’s edge to a service!
 What’s next?
Explore some of the popular tutorials on Emissary:
- Configuring Emissary communications: configure how Emissary handles communication with clients
- Intro to
Mappings: declaratively routes traffic from the edge of your cluster to a Kubernetes service Listenerresource: configure ports, protocols, and security options for your ingress.Hostresource: configure a hostname and TLS options for your ingress.
Emissary has a comprehensive range of features to support the requirements of any edge microservice.
To learn more about how Emissary works, read the Emissary Story.